PersistIQ is an outbound sales automation and customer discovery platform. It helps you find new customers, onboard them, and organize your outreach strategies effectively.
Getting started
RudderStack supports sending event data to PersistIQ via the following connection modes:
| Connection Mode | Web | Mobile | Server |
|---|---|---|---|
| Device mode | - | - | - |
| Cloud mode | Supported | Supported | Supported |
Once you have confirmed that the source platform supports sending events to PersistIQ, follow these steps:
- From your RudderStack dashboard, add a source. Then, from the list of destinations, select PersistIQ.
- Assign a name to the destination and click Continue.
Connection settings
To successfully configure PersistIQ as a destination, you will need to configure the following settings:
- PersistIQ REST API Key: Enter your PersistIQ API key. For more information on obtaining the API key, refer to the FAQ section below.
- Map RudderStack user attributes to PersistIQ Lead attributes: Use this setting to map your RudderStack event properties to the custom or non-standard PersistIQ lead attributes.
Identify
You can use RudderStack's identify call to create or update a lead (prospect) in PersistIQ. RudderStack sends the user information to PersistIQ via their /leads endpoint.
Creating a new lead
A sample identify call that creates a new lead in PersistIQ is shown below:
rudderanalytics.identify("1hKOmRA4GRlm", { name: "Alex Keener", address: "99 Blue Gum Street", email: "alex@example.com"})RudderStack automatically maps all the common attributes like name, email, city, etc. to the PersistIQ lead attributes. To map specific event properties to the custom PersistIQ lead attributes, use the Map RudderStack user attributes to PersistIQ Lead attributes dashboard setting to specify the mapping.
Supported mappings
The following table lists the mappings between the RudderStack properties and PersistIQ attributes:
| RudderStack property | PersistIQ property | Data type |
|---|---|---|
traits.dup | dup | String |
traits.creator_id | creator_id | String |
context.traits.email traits.email | lead[0].email | String |
context.traits.country traits.country | lead[0].country | String |
context.traits.city traits.city | lead[0].city | String |
context.traits.gender traits.gender | lead[0].gender | String |
context.traits.company traits.company | lead[0].company_name | String |
context.traits.phone traits.phone | lead[0].phone | Phone number |
context.traits.facebookUrl traits.facebookUrl | lead[0].facebookUrl | URL |
context.traits.twitterUrl traits.twitterUrl | lead[0].twitterUrl | URL |
context.traits.linkedinUrl traits.linkedinUrl | lead[0].linkedinUrl | URL |
traits.firstName traits.firstname traits.first_name context.traits.firstName context.traits.firstname context.traits.first_name | lead[0].first_name | String |
traits.lastName traits.lastname traits.last_name context.traits.lastName context.traits.lastname context.traits.last_name | lead[0].last_name | String |
traits.{x} context.traits.{x} | lead[0].{x} | - |
lead array is always 0.Updating an existing lead
RudderStack automatically updates a lead if the identify call contains the persistIqLeadId field in the externalId object. Otherwise, it creates a new lead.
A sample identify call that updates an existing PersistIQ lead is shown below:
rudderanalytics.identify("1hKOmRA4GRlm", { name: "Alex Keener", address: "99 Blue Gum Street", email: "alex@example.com"}, { "externalId": [{ "type": "persistIqLeadId", "id": "abc12345" }]})Supported mappings
The following table list the mappings between the RudderStack properties and PersistIQ attributes:
| RudderStack property | PersistIQ property | Data type |
|---|---|---|
externalId.persistIqLeadId Required | leadId | String |
traits.status context.traits.status | status | String |
context.traits.email traits.email | data.email | String |
context.traits.country traits.country | data.country | String |
context.traits.city traits.city | data.city | String |
context.traits.gender traits.gender | data.gender | String |
context.traits.company traits.company | data.company_name | String |
context.traits.phone traits.phone | data.phone | String |
context.traits.facebookUrl traits.facebookUrl | data.facebookUrl | URL |
context.traits.twitterUrl traits.twitterUrl | data.twitterUrl | URL |
context.traits.linkedinUrl traits.linkedinUrl | data.linkedinUrl | URL |
traits.firstName traits.firstname traits.first_name context.traits.firstName context.traits.firstname context.traits.first_name | data.first_name | String |
traits.lastName traits.lastname traits.last_name context.traits.lastName context.traits.lastname context.traits.last_name | data.last_name | String |
traits.{x} context.traits.{x} | data.{x} | - |
traits.status/context.traits.status must already be configured in your PersistIQ dashboard.Group
You can use the group events to add or remove a lead from a group in PersistIQ. RudderStack uses the /campaigns endpoint to send this information to PersistIQ.
A sample group call is shown below:
rudderanalytics.group("group01", { mailbox_id: "mbid123", operation: "add" // set to remove to remove user from a group}, { "externalId": [{ "type": "persistIqLeadId", "id": "abc12345" }]})traits.operation parameter to add. To remove a user from the group, set this parameter to remove.Supported mappings
The following table list the mappings between the RudderStack properties and PersistIQ attributes:
| RudderStack property | PersistIQ property |
|---|---|
groupId Required | campaign_id |
externalId.persistIqLeadId Required | leadId |
traits.mailbox_id context.traits.mailbox_id | mailbox_id |
FAQ
Where can I find the PersistIQ API key?
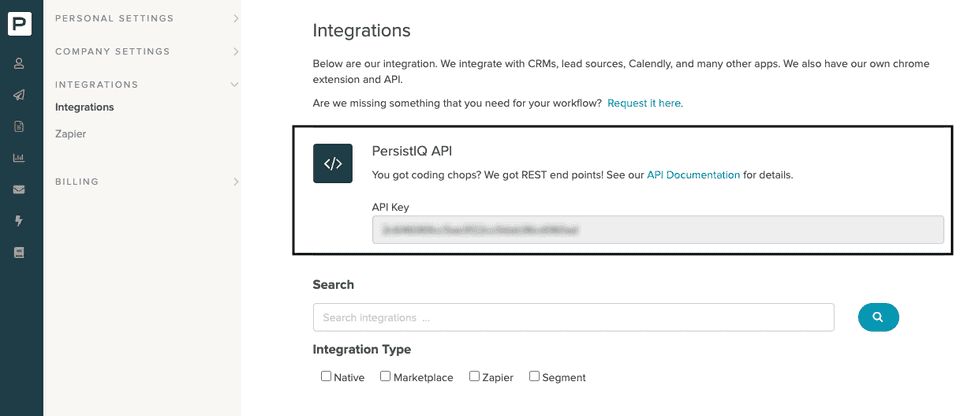
To get your PersistIQ API key, follow these steps:
- Log in to your PersistIQ dashboard.
- From the bottom left corner, click your profile button and go to Settings and Billing > Integrations. Your API key will be listed here, as shown:

How do I get the PersistIQ lead ID and campaign ID?
To get a prospect's lead ID in the PersistIQ dashboard, click the specific prospect. You can find the ID in the resulting URL, as shown:

Similarly, to get a campaign ID, go to Campaigns in your dashboard and click the required campaign. The ID should be visible in the resulting URL.

Contact us
For more information on the topics covered on this page, email us or start a conversation in our Slack community.